In this mini-tutorial, we will look at bringing components - either parts or other assemblies- together into assemblies. Like the creation of features in a part, parts in an assembly have to be brought together in relation to each other in such a way as to fully constrain them. That is, the relative rotation and location of the parts to each other has to be specified in all three dimensions. This done through two primary types of constraints:
With both of these constraints there is an alternative offset option. With the offset option, an offset distance for the two datums/faces/edges/axes is specified. In addition to these primary constraints, there are also other constraint options such as orient, edge on surf, and tangent.
Before you begin, there are a couple of things to keep in mind:
Assemblies are created in assembly mode. As with parts and drawings, you can either retrieve an existing assembly or create a new one. Once you open an assembly, the model tree window opens, but instead of listing features, it will list components brought into the assembly.
Begin the assembly by bringing in the first component. This is considered the base component.
component>assemble
Unfortunately, there is not a search/retrieve option, so you must know the names of your components (e.g., part or other assembly files).
Since there are no other parts in the assembly yet, you do not need to constrain it. This part now is listed in the model tree window. If you needed to orient this base part in a certain way, you could have used
create>datum plane or datum axis or coord sys
first to create assembly level features to which to constrain the base component to. These features will be listed on the model tree and named beginning with the letter A (e.g., ADTM1).
The second and each successive component will have to be constrained to one or more of the existing parts or assembly level features in the assembly. Start as you would for the first component:
component>assemble
This time, once you've entered the file name, the part can be dynamically located in the model window with the mouse. Locate the purple representation of the part near the other part(s) it is to be constrained to and click the mouse. Though it looks as though the component has been located, it must be fully constrained before it can stay in the assembly.
Once you have finished a constraint, the command window will tell you have either fully constrained the component or say nothing. If it says nothing, you need to add more constraints. It usually takes two or three constraints to fully constrain the component.
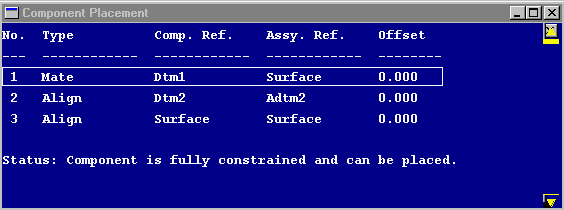
At any time you can review you progress by looking at a window which is hidden behind your model window, called the component placement window (Figure 1).
Figure 1.
This window lists the type of constraint, the component and assembly references, and any offset distance. It will also tell you at the bottom whether the component can be placed. If you have made a mistake with a constraint, you can click on the constraint in the window and use Del Constrnt or RedoConstrnt menu options to fix the problem. The assembly and component references will highlight in the model window when you choose a constraint in the component placement window.
Once you have fully constrained the component, choose done. If after you have placed a component and you decide it was done improperly, you can redo it with:
component>redefine
Look in the relations mini-tutorial for information on creating relations in assemblies.